Lightroom workflow for wedding photographers: Importing and Organizing
Meet your SEO guy
Ryan Moreno
I'm a Showit SEO specialist with a passion for teaching creative professionals simple, actionable SEO tips and tricks that will help you grow your business online.
Are you ready to learn SEO?
The Sexiest Showit Websites Ever
Being a wedding photographer myself, I’ve learned the importance of using Lightroom.
Its one of the best tools for keeping all of your images organized and in one place.
I also know how confusing and jumbled your images can get if you don’t have the right file organization process.
If you feel like your images are unorganized and all over the place, and you want to know how to stay organized in Lightroom, this post is for you. This Lightroom workflow post will help you get organized and stay that way.
In this post, I will teach you:
How and where I create my Lightroom catalogs to stay organized
How to import images into your Lightroom catalog
How to organize images into subfolders inside Lightroom
Before we jump into this post, I wanted to let you know that if you’re looking for SEO help, I have a few ways I can help you.
I have a free SEO blog post checklist that you can download today that shows you how to craft beautiful, SEO-friendly blog posts.
I also have a really great, easy-to-use, Showit SEO Course that covers everything you need to know about Showit SEO all in one place.
And lastly, I create a ton of free SEO resources for Tonic Site Shop. Check them out!
Creating a Lightroom Catalog on your external hard drive
Every year I start with 2 formatted external hard drives that I keep my catalog for the year on as well as all images from that year.
The first hard drive acts as my main (working) hard drive and the other acts as my backup.
I keep everything besides Lightroom itself on the external hard drive so that I can access my Lightroom catalog and edit my images on any computer that has Lightroom installed on it.
To create a Lightroom catalog on your external hard drive follow these steps:
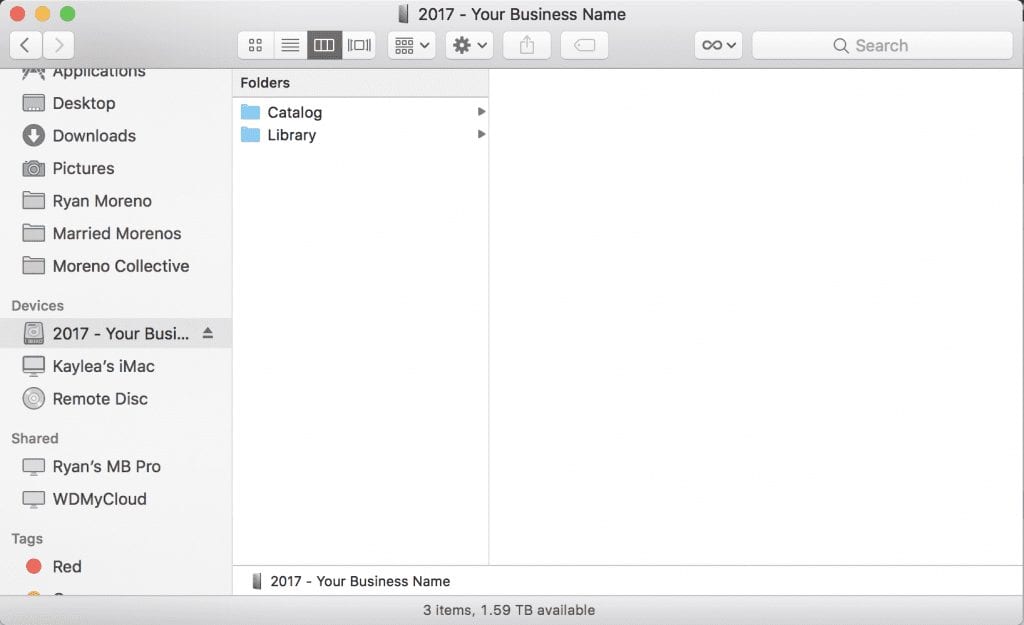
Connect your new external hard drive to your computer
Open your external hard drive and create 2 folders; ‘Catalog’ and ‘Library’.
Open Lightroom. Lightroom will open the last catalog you had open. (If you don’t already have a catalog you will be prompted to create a new one.)
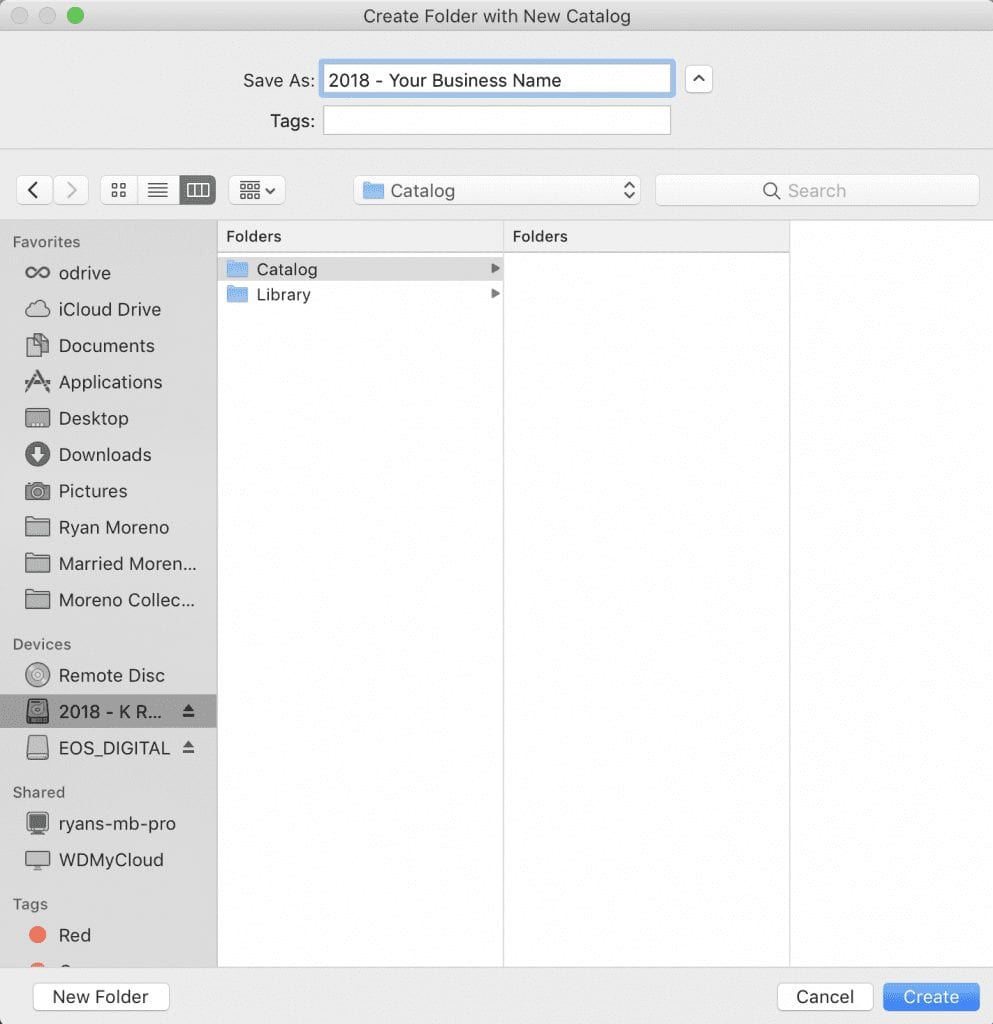
Navigate to ‘File’ at the top of the page and click ‘New Catalog’.
You will be prompted to name your new catalog and choose the destination of the new catalog. Find your hard drive and select the folder named ‘Catalog’ then click Create.
How to import images into Lightroom
Importing your images correctly is a valuable process to understand as wedding photographers.
Most of you are likely importing tens of thousands of images per year which makes it easy to get lost in all the files and folders if you don’t have everything organized.
By importing your photos correctly into subfolders you will stay organized all year
To import images into Lightroom and keep them organized follow these steps:
Select File > Import Photos and Video… from the Lightroom navigation.
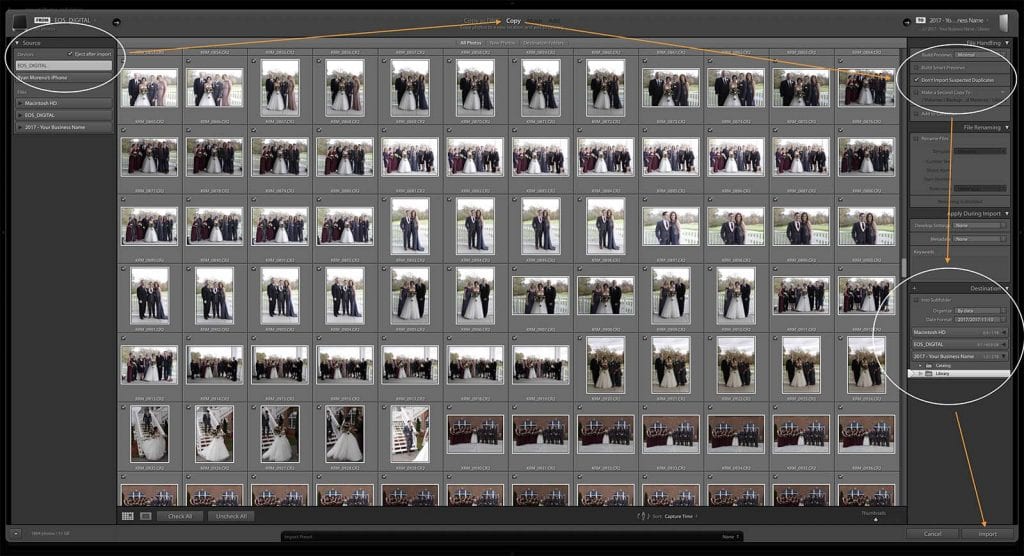
Once the import window is open, select your source from the left side, usually your SD card or the folder of your film scans.
Next, choose ‘Copy’ from the top middle of the import window. This will create a fresh copy of the image onto your external hard drive.
Under the ‘File handling’ tab on the right-hand side, make sure ‘Don’t Import Suspected Duplicates’ is checked. This will save you from importing duplicates by accident.
Under the ‘Destination’ tab, make sure you have ‘Organize – By Date’ and ‘Date format – 2017/2017-11-10’ (This will be different of course depending on today’s current date)
The destination of the images should be the folder we created named ‘Library”.
Select ‘Import’. Once you select Import, Lightroom will automatically create a folder called ‘2017’ (or your current year) in the ‘Library’ folder. Then it will automatically create and import all of the images you had selected into a folder named after the date the images were shot on (YYYY-MM-DD).
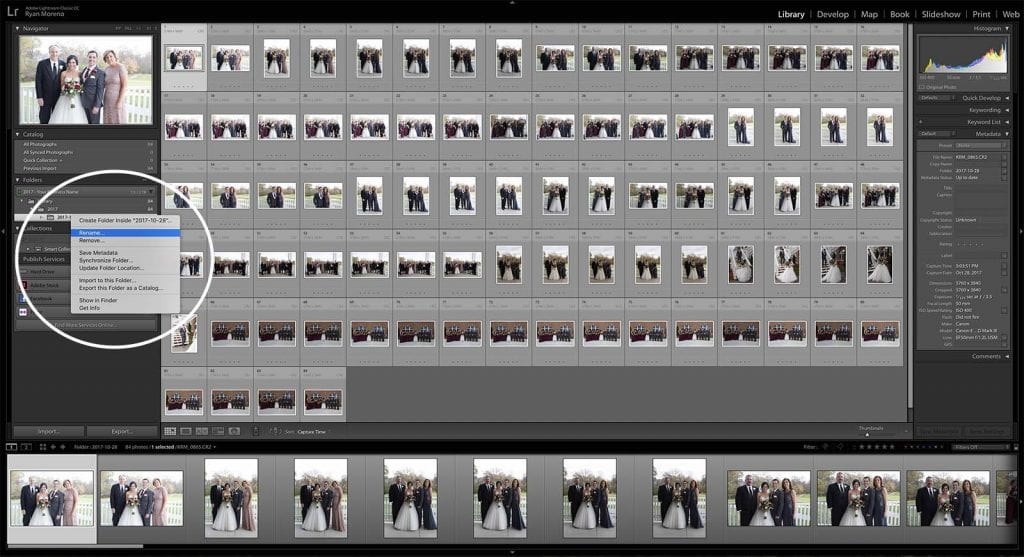
Once your images have imported, right click on the folder with the images and select ‘Rename’.
Add the names of the client after the date (leaving the date). This will keep your shoots organized chronologically and not alphabetically.
Organizing photos into subfolders in Lightroom
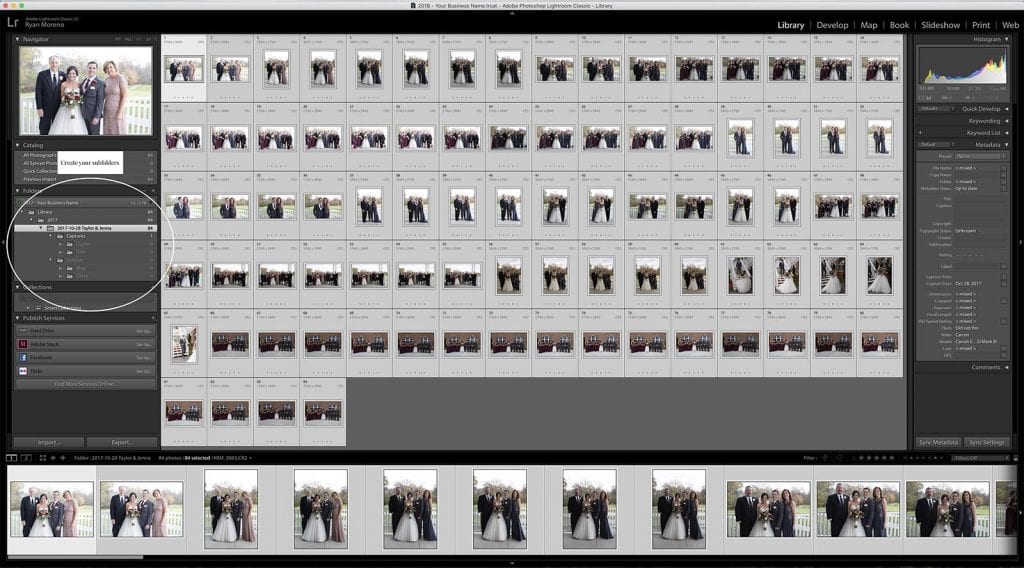
Once I have all of the images for the wedding imported I create 2 subfolders inside of the main folder, ‘Captures’ and ‘Outputs’.
Your captures folder will hold all of your original imported raw files and film scans. The outputs folder will hold all of your exported photos, for blog and client.
This is the key to keeping everything organized and easily accessible.
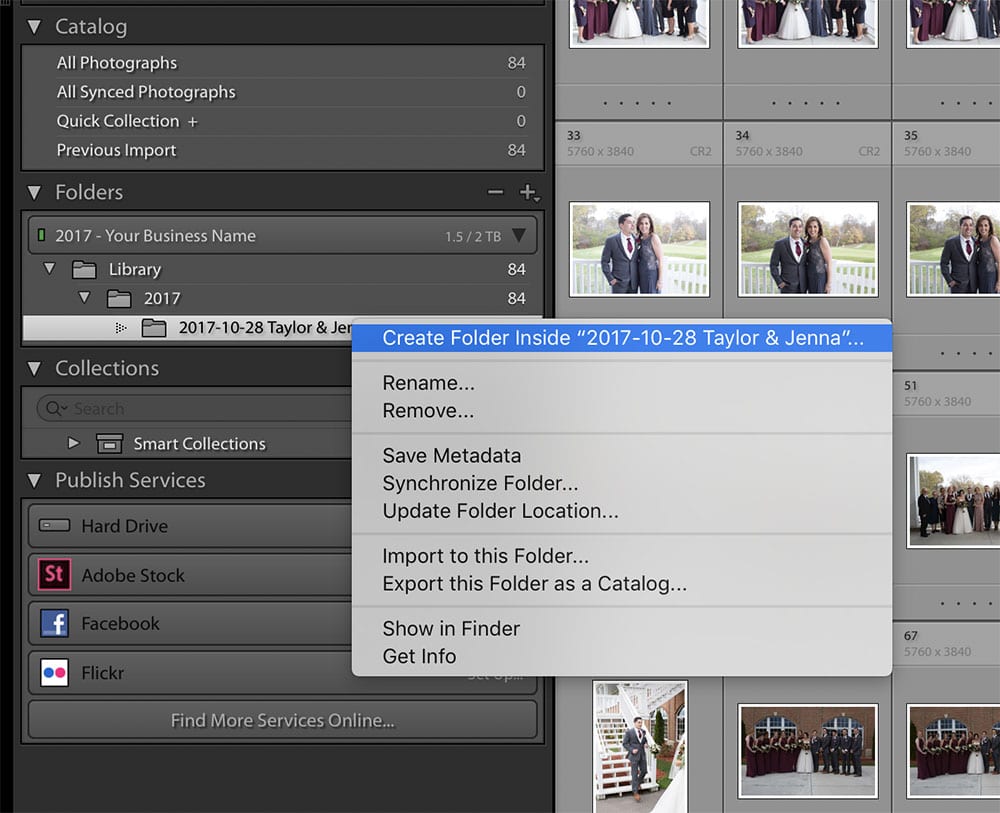
To create subfolders in your catalog follow these steps:
Right-click on the main folder, in this case, ‘2017-10-28 Taylor & Jenna’ and select “Create Folder Inside…”
Name the first folder ‘Captures’
Create another folder in the main folder named ‘Outputs’
If you shoot film and digital, create 2 folders inside ‘Captuers’, one named ‘Film Scans’ and the other named ‘Digital’. (disregard this step if you only shoot with one medium)
Now create 2 folders in your ‘Outputs’ folder, ‘Blog’ and ‘Client’.
Now that you have all of your folders created, select all images ( command – A ) and drag the images into the captures folder. Be sure to separate digital and film if needed.Reminder: Always move images inside of the Lightroom application. This way Lightroom knows where the photos are. If you move them outside of Lightroom, in finder (on mac), Lightroom will say that the images are missing.
You are now ready to start editing your images.
Pro Tip:
You can always make more subfolders. For example, if you post a lot to Instagram, you can create an Instagram folder inside your ‘Outputs’ folder and export web-sized images to that folder that you want to specifically post to social media.
This makes it so much easier to find the images you want to post to Instagram, rather than digging through your 80 blog images, or even worse, the 600-1200 images you export for your client galleries. And you can come back 2 months later and easily find those Instagram photos again!
Conclusion
There are many ways to keep images organized in Lightroom as a wedding photographer. This is the easiest and most efficient way my wife and I have found to keep organized.
If you travel a lot for weddings, keeping all of your images on one external hard drive is a great way to stay organized and stay portable.
In the next post, I will explain how I export my images in Lightroom. I will show you the export setting I use for blog images (web-sided), and images that are uploaded to client galleries.
Hey there! I love this, I need a new system in place and I think this is a bit more organized than how I am currently operating. Question for you- I currently use smart previews and edit while on thee go without my hard drive. Does this still allow for editing without an external hard drive connected or since the catalog is on the hard drive does it have to be connected? Thanks!!
Great question! If you edit on the go, I would save your lightroom catalog on your computer and back up up to your hard drive. That way when you create smart previews and disconnect your hard drive you’ll still be able to access your catalog!


This was sooo helpful! Thank you thank you for posting a succinct and actually workable flow 🙂
Aurora, I’m so glad I could help! Let me know if there is anything else I could help with regarding Lightroom 🙂
Thank you so much!!! Finally I got an idea of how to have a functional system… So helpful…
Hey Pernille! So glad this helped you! I will actually be coming out with a video series soon 🙂
Hey there! I love this, I need a new system in place and I think this is a bit more organized than how I am currently operating. Question for you- I currently use smart previews and edit while on thee go without my hard drive. Does this still allow for editing without an external hard drive connected or since the catalog is on the hard drive does it have to be connected? Thanks!!
Great question! If you edit on the go, I would save your lightroom catalog on your computer and back up up to your hard drive. That way when you create smart previews and disconnect your hard drive you’ll still be able to access your catalog!